NOTE: If you get the warning about this page wanting to run scripts or an ActiveX control, it's because of a couple javascript routines to play sounds, display a cursor, or improve navigation. There are no ActiveX routines associated with this page. I don't do viruses or hacker crap, but it's your choice...You won't miss anything important by refusing permission.
page 2 - HOW TO BUILD A $10 PLANS HOLDER
| SAFETY FIRST. Wear proper protective gear and educate yourself in all appropriate safety precautions before working with the tools and materials.
|
NOTE
Because it was necessary to make several revisions during the design and construction, I did not document the process with photographs. Most of the images in this tutorial are computer renderings based on the final design. If you note a disparity between the text and the illustration, follow the written instructions (and please notify me of any needed clarifications).
It took far longer to make the CG prototype than it did the actual plans holder. The construction is very simple and quick.
STEPS
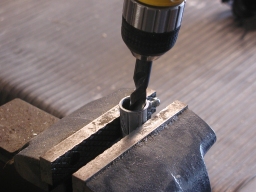
- These couplers have a small internal ridge halfway down their length to serve as a stop for the tubing. This ridge needs to be removed for our purposes. The metal is soft--I believe aluminum. I used a twist drill bit in an electric drill and applied lateral pressure to the ridge until the interior of the coupler was uniformly smooth.
|
|
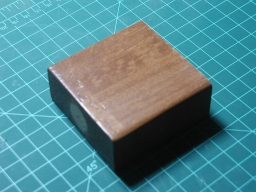
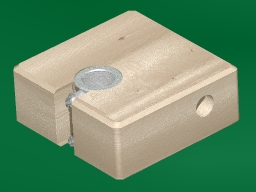
- You will need an approximately 3 inch square by 1 1/2 to 2 inch thick piece of wood. I had a nice piece of some sort of hardwood sawn from the legs of a headboard, but any good, solid piece of wood should work.
In the CG illustrations (below), the dimensions of the wooden block are based on the piece I used--3 inches square by 1 1/4 inches thick. (The coupler is 1 1/2 inches long, and sticks out the bottom a bit.)
|
|
|
- Measure
 the widest diameter of the EMT coupler. (The coupler illustrated on Page 1 is 15/16 inch). The radius is 1/2 of the diameter. Add 3/8 to 1/4 inch to the radius. Mark a center point on the top of the block of wood, such that the distance from the edge of the block to the center point is the radius plus 3/8 to 1/4 inch.
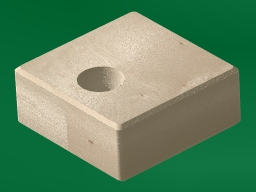
- Using an appropriate bit (e.g.: spade boring
 , Forstner , Forstner , etc.) approximately the diameter of the coupler (slightly larger is acceptable), carefully drill through the block at the point marked in Step 3 (above). As mentioned, the coupler I used was 15/16 inch; the bit I used was 1 inch. , etc.) approximately the diameter of the coupler (slightly larger is acceptable), carefully drill through the block at the point marked in Step 3 (above). As mentioned, the coupler I used was 15/16 inch; the bit I used was 1 inch.
This hole should be exactly perpendicular to the surface. This is easily accomplished with a drill press. If, like me, you don't own a drill press, use a drill guide . .
|
 |
|
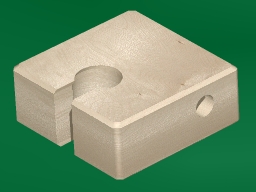
- Choose a side for the arm and mark another center point on that side, approximately 3/4 inch from the back of the block. It's more convenient if the set screws are accessible from the front. The arm assembly rotates and can be slipped on the upright either side up, so which side you choose is not critical.
Again being very careful to keep the bit perpendicular to the surface, drill a hole (diameter to match that of the dowel) about halfway into the block. This hole will need to clear the large hole drilled in Step 4 (above).
- Cut an approximately 1/2 inch wide gap from the front face to the large hole, as shown in the illustration. I used a 1/2 inch straight bit
 with my router in its table. with my router in its table.
|
 |
|
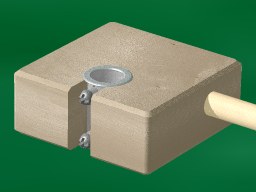
- Using a two part epoxy putty such as FastSteel, wrap a thick layer around the outside of the coupler, except near the posts.
- Insert the coupler into the hole in the block of wood, with the set screw posts in the gap.
- Scrape off the excess epoxy (if there isn't any, you didn't use enough) and set the assembly aside to cure (for FastSteel, about one hour), preferably on a surface that will not stick to epoxy.
[TIP: In every package of Oscar Mayer Turkey Bacon is a polyethylene sheet which is perfect for this purpose. Its size and flexibility are convenient and, being polyethylene, no standard adhesive will adhere to it.]
|
|
|
- When the epoxy is cured, put some wood glue in the side hole and insert the dowel.
- Set the unit aside to dry. This completes the arm assembly.
|
|
|
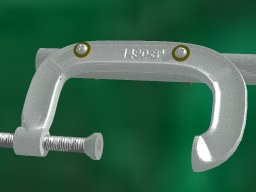
- Drill two holes in the c-clamp, as shown. Again, use a drill press or drill guide and be very careful to keep the bit perpendicular to the surface. The diameter of these holes should form a snug fit for the machine screws.
- Use the c-clamp holes as a template and carefully mark the positions on one end of the EMT.
- Drill matching holes through the tubing at the points marked in the preceding step. It's important these be exactly aligned with those in the c-clamp.
- Using the machine screws, nuts and washers, assemble the tubing to the c-clamp. This completes the upright assembly.
|
|
|
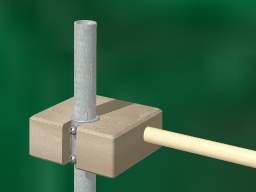
- Loosen the set screws in the coupler and slide the arm assembly onto the upright.
|
 |
|
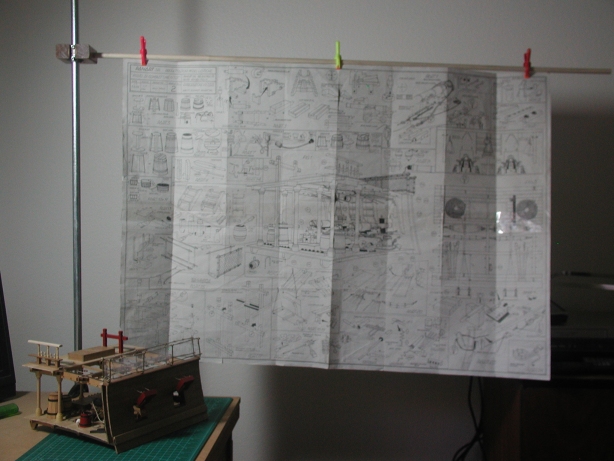
- Mount the plans holder to your worktable.
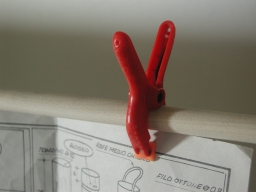
- With a 1/2 inch dowel as the crosspiece, these small plastic spring clamps are ideal for attaching plans and booklets to the holder. If you decided to use a larger and more rigid dowel, you'll need to use one of the larger sizes.
You can add a second arm assembly to secure the bottom edge of the plans, if you want to keep them taut.
|
 |
 I hope these instructions are useful. Any constructive comments or suggestions would be welcomed.


All original contents copyright bilagaana. All rights reserved.
This page uses the optional Paddington font.
The CG plans holder was rendered in good old Ray Dream Studio.